Thursday, June 3, 2010

Changing default language on RHEL 4 Device

I was testing a application  on RHEL 4 device. There was one set of test cases to be executed in different locale. Searching in google how to change the default language of machine. After lots of googling, i found, it was in bits and pieces. So I taught to share this information the tested version of it.

While installing RHEL 4, usually we install default lanaguage as English. If you want to change to other locale its very simple in RHEL 4, you just need to change only one file with proper local.

Default configuration would be :
[root@rhel4-device ~]# cat /etc/sysconfig/i18n
LANG="en_US.UTF-8"
SUPPORTED="en_US.UTF-8:en_US:en"
SYSFONT="latarcyrheb-sun16"
[root@rhel4-device ~]#

If you want to change the locale to french, you need to change the LANG and remove the rest.
[root@rhel4-device ~]# cat /etc/sysconfig/i18n
LANG="fr_FR.UTF-8"
[root@rhel4-device ~]#reboot

Below are the list of LANG maps 
Bulgarian bg_BG.UTF-8 bg Europe/Sofia
-Catalan ca_ES.UTF-8 es Europe/Madrid
Chinese(Simplified) zh_CN.UTF-8 us Asia/Shanghai
-Chinese(Traditional) zh_TW.UTF-8 us Asia/Taipei
-Croatian hr_HR.UTF-8 croat Europe/Zagreb
-Czech cs_CZ.UTF-8 cz-lat2 Europe/Prague
Danish da_DK.UTF-8 dk Europe/Copenhagen
Dutch nl_NL.UTF-8 nl Europe/Amsterdam
English en_US.UTF-8 us America/New_York
Estonian et_EE.UTF-8 et Europe/Tallinn
-Finnish fi_FI.UTF-8 fi Europe/Helsinki
French fr_FR.UTF-8 fr-latin1 Europe/Paris
German de_DE.UTF-8 de-latin1-nodeadkeys Europe/Berlin
Greek el_GR.UTF-8 gr Europe/Athens
-Gujarati gu_IN.UTF-8 us Asia/Calcutta
-Hindi hi_IN.UTF-8 us Asia/Calcutta
Hungarian hu_HU.UTF-8 hu Europe/Budapest
-Icelandic is_IS.UTF-8 is-latin1 Atlantic/Reykjavik
Indonesian id_ID.UTF-8 us Asia/Jakarta
Italian it_IT.UTF-8 it Europe/Rome
Japanese ja_JP.UTF-8 jp106 Asia/Tokyo
-Kannada kn_IN.UTF-8 us Asia/Calcutta
-Korean ko_KR.UTF-8 us Asia/Seoul
-Macedonian mk_MK.UTF-8 mk Europe/Skopje
-Malay ms_MY.UTF-8 us Asia/Kuala_Lumpur
-Malayalam ml_IN.UTF-8 us Asia/Calcutta
-Marathi mr_IN.UTF-8 us Asia/Calcutta
Norwegian nb_NO.UTF-8 no Europe/Oslo
-Northern latarcyrheb-sun16 nso_ZA.UTF-8 us
-Oriya or_IN.UTF-8 us Asia/Calcutta
Polish pl_PL.UTF-8 pl2 Europe/Warsaw
Portuguese pt_PT.UTF-8 pt-latin1 Europe/Lisbon
Portuguese(Brazilian) pt_BR.UTF-8 br-abnt2 America/Sao_Paulo
-Punjabi pa_IN.UTF-8 us Asia/Calcutta
Russian ru_RU.UTF-8 ru Europe/Moscow
-Serbian sr_CS.UTF-8 sr-cy Europe/Belgrade
-Serbian(Latin) sr_CS.UTF-8@Latn sr-cy Europe/Belgrade
-Sinhala si_LK.UTF-8 us Asia/Colombo
-Slovak sk_SK.UTF-8 sk-qwerty Europe/Bratislava
Slovenian sl_SI.UTF-8 slovene Europe/Ljubljana
Spanish es_ES.UTF-8 es Europe/Madrid
Swedish sv_SE.UTF-8 sv-latin1 Europe/Stockholm
-Tamil ta_IN.UTF-8 us Asia/Calcutta
-Telugu te_IN.UTF-8 us Asia/Calcutta
Turkish tr_TR.UTF-8 trq Europe/Istanbul
-Ukrainian uk_UA.UTF-8 ua-utf Europe/Kiev
-Vietnamese vi_VN.UTF-8 us Asia/Saigon
-Welsh cy_GB.UTF-8 uk Europe/London
-Zulu zu_ZA.UTF-8 us Africa/Johannesburg
Note: Not sure, whether RHEL 4 supports all of them.

Friday, March 26, 2010

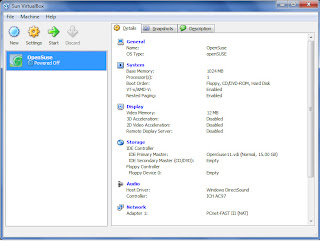
Creating OpenSuse11 Virtual Machine using VirtualBox

VirtualBox is a general-purpose full virtualizer for x86 hardware. Targeted at server, desktop and embedded use, it is now the only professional-quality virtualization solution that is also Open Source Software.

VirtualBox is supported on Windows, MAC and Linux platforms.

Its very easy to install VirtualBox software. Get the latest version from http://www.virtualbox.org/wiki/Downloads

I have installed Virtual Box on Window 7. It very simple to create Virtual Machine and take snapshots.

Lets create OpenSuse 11.0 Virtual Machine.
Prerequisite:
OpenSuse 11.0 DVD or ISO dump

Launch Virtual Box application. To create New virtual machine, either click on "New" or "Machine-> New".
Step 1: Specify Name to Virtual Machine, say Opensue and Select OS Type as "Linux" and Version as "OpenSUSE".
Step 2: Select the RAM for the virtual machine

Step 3: Select the Harddisk Image, you have option to create new or use from the existing VM harddisk. As its fresh installation, Select "Create New Harddisk"

Step 4:Click Next

Step 5: Select Harddisk storage Type, Dynamic or Fixed.

Step 6: Select Location for Virtual machine and Total Hard disk size.

Step 7: Summary Page would display and Verify the configuration which you have done.

Now we are done with Creating Virtual Machine for OpenSuse, next step would be starting the virtual machine and install the OpenSUSE operation system. Installation would be similar to the regular install. 

Insert the OpenSuSE DVD in your DVD rom.

Power on the newly created Virtual Machine, Click Next 


Choose the Media Source : Location of OpenSuSE build


Review the Summary:

Go ahead with OpenSuSE installation:

Note: Use Right Ctl to switch between Host machine and Virtual Machine.

After the installation, you can start using your favorite operating system.

If you use virtual machine for testing purpose, you can Take Snapshot/ Revert Snapshot based on your requirement.

Note: Its recommended while taking snapshots, power off your machine. Snapshot size will be less and reverting to the snapshot will be faster.


Monday, January 18, 2010

NFS Server Setup

The Network File System is certainly one of the most widely used network services. Network file system (NFS) is based on the Remote procedure call. It allows the client to automount and therefore, transparently access the remote file systems on the network.


Three simple steps to share your files in Linux using nfs share
1. Start nfs service :
santosh-test:~ # /etc/init.d/nfsserver start
Starting kernel based NFS server done
santosh-test:~ #


2. Add required file to export file:
Add abosulte path to exports file. * is to allow this share to be mounted by any nfs client on the network and used options as (ro) readonly permission and get synchronize automatically.
santosh-test:~ # ls /Image/Updates
Package            Opera
MozillaFirefox     Messengers

santosh-test:~ # cat /etc/exports
/Image/Updates *(ro,sync)   

santosh-test:~ #


Verifiy the path using exportfs command

santosh-test:~ # exportfs
/Image/Updates


santosh-test:~ #  


3. Restart nfs service:
Restart nfs service
santosh-test:~ # /etc/init.d/nfsserver restart
Shutting down kernel based NFS server   done

Starting kernel based NFS server        done
santosh-test:~ #  


Testing:
Tested on SLES10/11 and RHEL 5
santosh-test-client:~ # showmount -e santosh-test
Export list for 164.99.98.64:
/Image/Updates *
santosh-test-client:~ # mount santosh-test:/Image/Updates /mnt/
santosh-test-client:~ # ls /mnt/

Package            Opera
MozillaFirefox     Messengers 
santosh-test-client:~ #  


More information: Linux NFS-HOWTO